
DISCLAIMER
this post is bound to have exclamations at the end of every sentence due to frustration or excitement.
i will therefore add no exclamation points.
just know that there's a lot more emotion in all these sentence than just a period.
refinishing 3 dressers between the months of 6-8 months pregnant is a ton of work,
but totally doable nonetheless.
when we moved to nebrasaka we literally had no furniture other than a bed and a few random little pieces.
couch, table/chairs, and dressers were our first priorities.
i decided from the get-go that it'd be much more cost effective (and fun) to buy dressers off craigslist and paint them to my specifications.
we were finally in a position of our lives where we could do so.
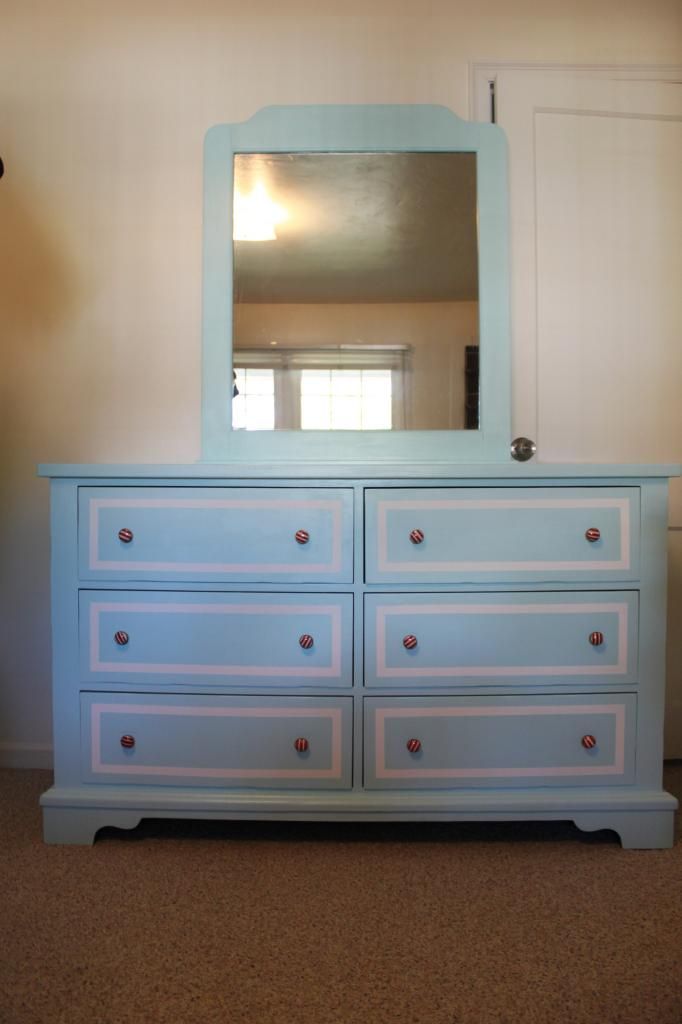
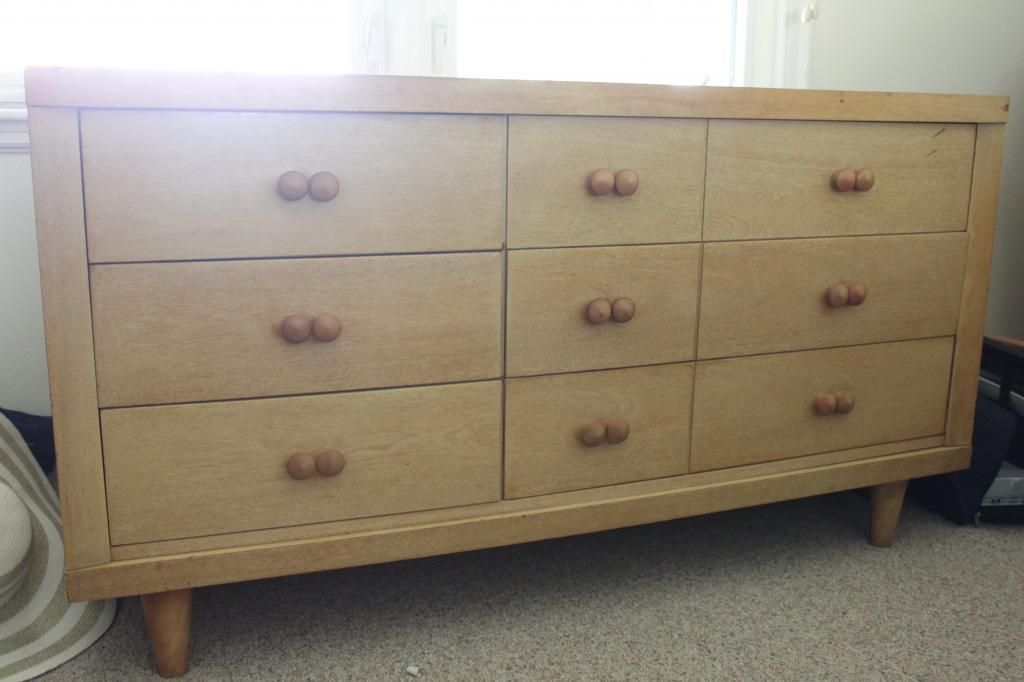
DRESSER NUMBER 1: our bedroom.
this was actually the 2nd dresser we got but first we began working on.
some saintly woman was giving it away for free on craigslist and i jumped on her like kids on candy.
it was really a great piece to begin with.
a dark wood, a few scratches here and there, drawers slid nicely, but overall in awesome shape.
casey sanded his poor little hands off on this sucker (actually he did on every one)
i'm so thankful for his help on sanding, i just don't like that job at all.
we had put on 3 coats of primer and i hadn't yet decided what color i wanted for it yet.
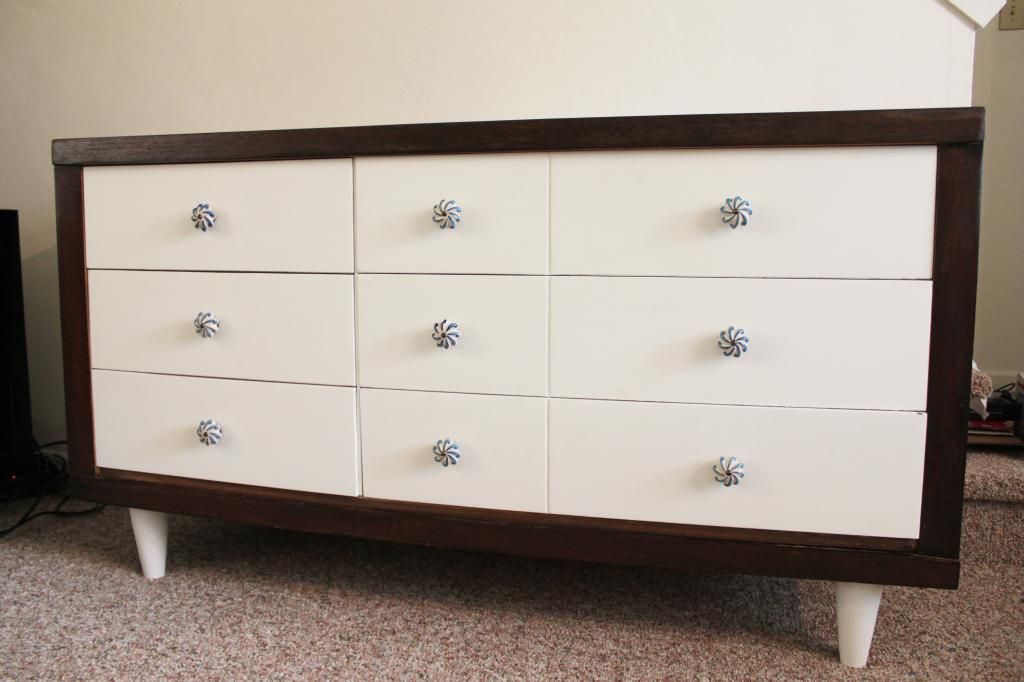
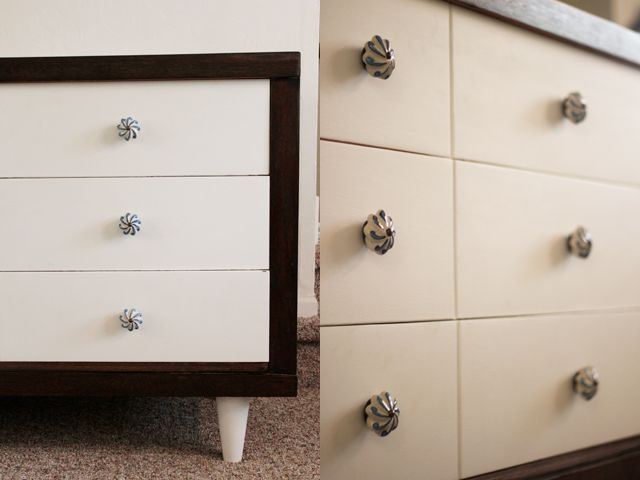
i finally decided on a brighter light blue to go along with our bedspread.
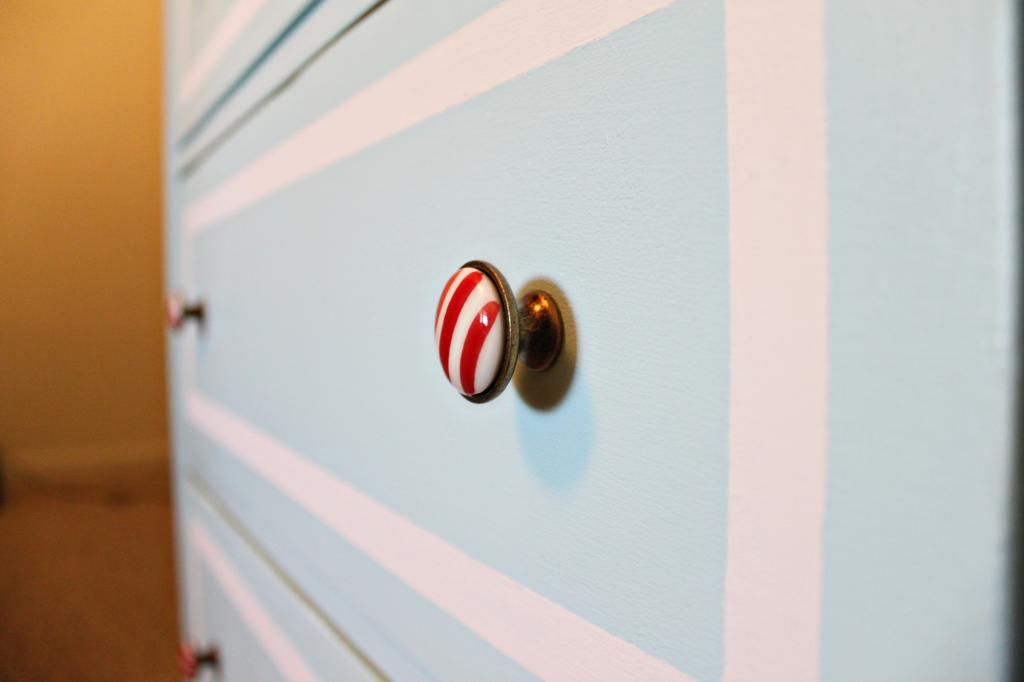
in the middle of painting, i went to hobby lobby and saw that ALL their knobs were 50% off.
hallelujah.
that made it possible so i didn't have to go back A MILLION TIMES with my coupon.
i bought the 12 for this dresser, 9 for the one i knew we already had, and 12 for the future one i hoped to be getting...ha.
casey helped out a lot with priming and painting of this dresser.
we rolled on most of the paint with a mini roller and used a brush for small parts.
this dresser definitely took the longest to paint.
after painting it blue, my neighbor, katie, helped me tape and paint the white rectangle.
her time was SO HELPFUL.
there's no before picture on this dresser but here is the final product.
also, if you care to know, pinterest was of course my bff on a lot of these products.
when i was looking up directions for taping of things to paint lines they suggested taking off the tape between every coat to ensure really sharp lines.
even when people did that though, it still bled a little.
that would have taken forever with all our lines taped off.
katie encouraged me to keep them on since we were doing 3 coats of white to cover up the blue.
so glad it did.
sure, i had to go back through with an itty bitty paint brush of blue to clean up the white that bled but it took way less time to do that than retape.
also, it's better to pull the tape off at a right angle...
DRESSER NUMBER 2: THE BABY'S ROOM
this was the third dresser we obtained.
a craigslist ad said there was a free blak dresser on the curb, so we jumped in the car and went looking for it.
not going to lie, it was nasty when we got it.
super dusty/dirty and the bottom was covered in old spider webs and the inside had dead spiders in it.
even now thinking about it i'm disgusted that we actually took it on...
i was super hesitant at actually putting it in our house (and using it for our baby's room) because of the worry of bugs.
so i washed it down with soap and water
and sprayed bug spray ALL OVER IT multiple times,
the first time just a bug repellant because that's what we had on hand and the second time an actual contact killer.
we sprayed it crazy well (2 times) with the killer stuff so i'm not worried so much anymore about it...
so it began nasty black with this yucky plastic gold lining between the rows of drawers and bottom.
(imagine all black, flat drawers...)
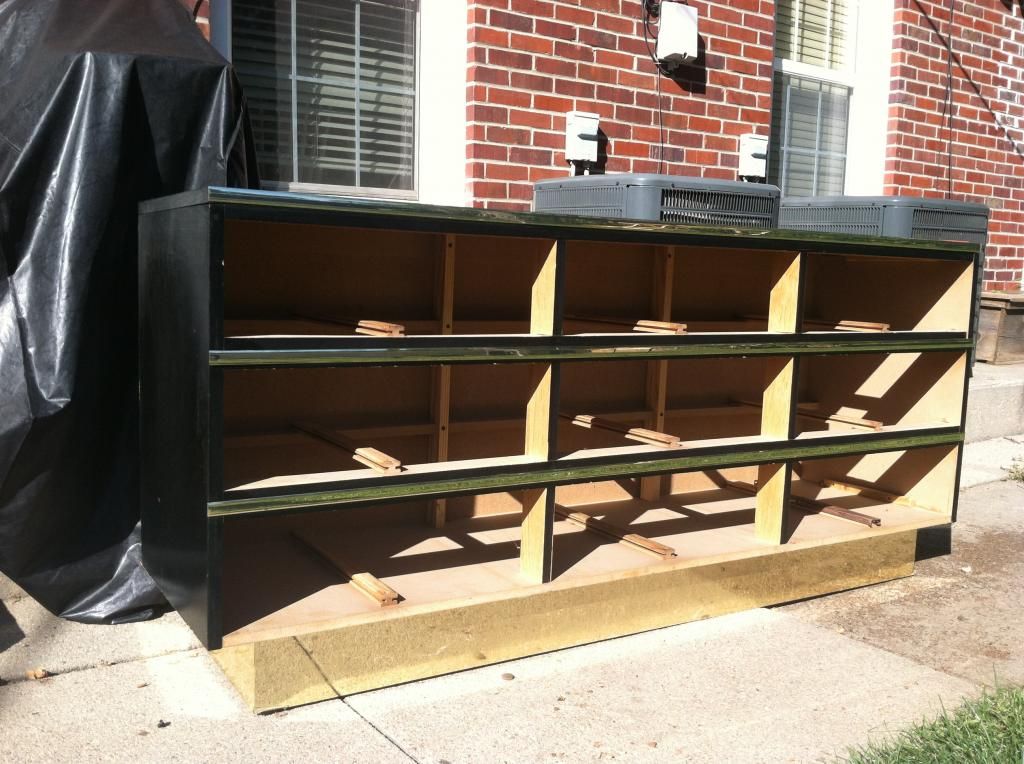
we finally figured out we could just rip the gold stuff off.
yay, for less hassle of figuring out how to paint that stuff.
casey, again, was the wonderful man and sanded the crap out of that thing.
i sincerely felt bad for how long he spent on it.
thank goodnesss we bought and electric sander to begin with...
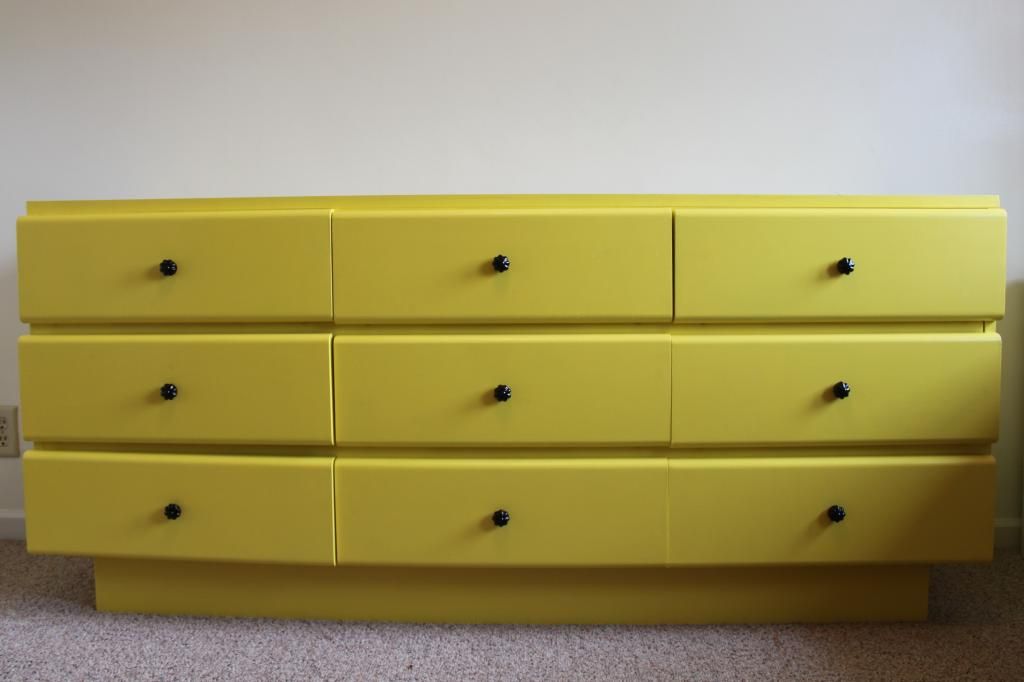
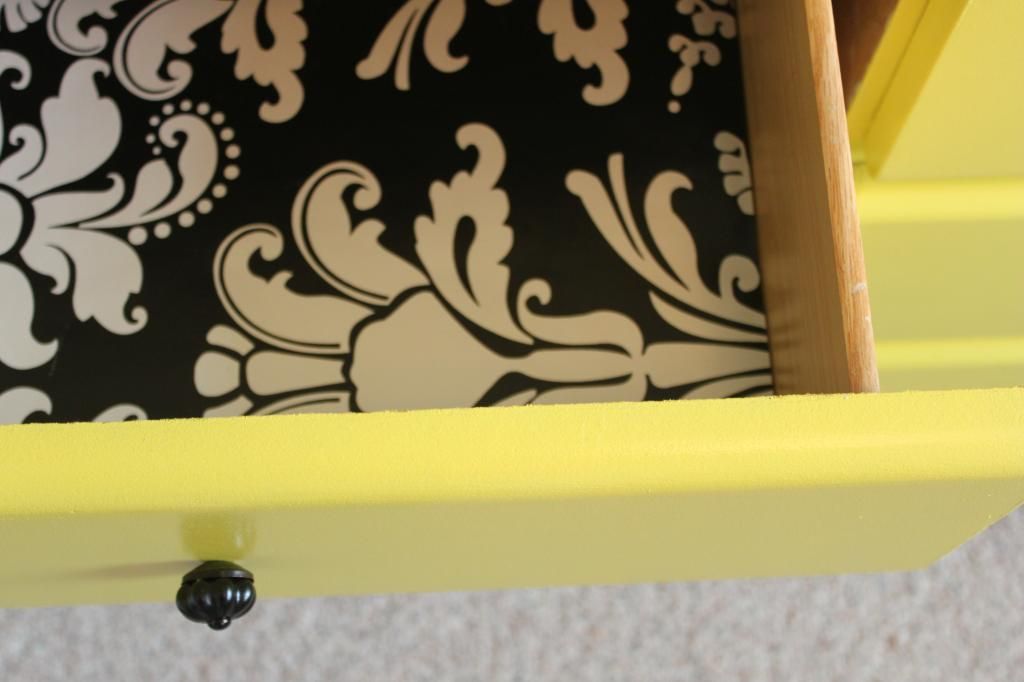
i knew form the start i wanted the baby's room dresser to be a bright, fun yellow.
something that just pops, with black knobs.
there were no black knobs when i was at hobby lobby that i liked but there were white ones.
so i got the white, gave a quick sand down to roughen them up, and spray painted them black.
loved the way it looked.
because there were no knobs on the drawers to begin with, we drilled holes for new knobs.
because there were no knobs on the drawers to begin with, we drilled holes for new knobs.
i think all together we did 3 coats primer and 3 coats yellow.
i also had to use gorilla glue to glue the sliders underneath the drawers back on.
and although i washed out the insides and outsides of the drawers with soap, i lined the insides with a wrapping paper i love that i had on hand because a) then the baby's stuff will be touching the paper and not the drawers and b) it looks better that way :)
this dresser wore me out physically with all the sitting, bending, attention to detail needed.
i had to take like a 3 day rest from doing anything laborous to heal my (pregnant) back.
DRESSER NUMBER 3: THE TV STAND DRESSER
after seeing a few pins on pinterest that showed how dressers could work as TV stand i knew that's what i wanted to do for this place because of the limited space.
it was a matter of finding a dresser deep enough because we'd have to angle our TV.
the 2nd day we were here in lincoln we found this puppy on craigslist and got it for $20.
it was in some old persons house and in great condition.
it was just a boring yellowy wood color.
we used it as our dresser til we were able to get all the other dressers worked out.
i saw this pin and knew that's what i wanted to do to it.
it began looking like this was going to be the easiest of the 3 dressers.
sanding was a breeze and so darn fast.
the next day possible i had gotten 3 coats of primer on the drawers and 1 coat of stain and clear coat on the dresser itself.
the next morning when looking at them there were brown spots all over the drawers.
it must have lightly rained with a little wind and all the drawers had brown ringspots littering them.
we tried cleaning them off, that didn't work.
then tried putting 2 coats of primer on top, that didn't work.
it was back to sanding...
blah, i was so frustrated with having to still work on this, they should have easily been done.
and i wasn't about to sand them but casey was so busy with school and such.
it was quite a few days til casey was able to get around sanding them with school and it being so cold out.
it seemed like it was never going to get warm enough to paint them.
the coming monday was going to be the warmest day we'd had in 5 days and the warmest of the coming week: 72 degrees.
casey came home at lunch and went to work sanding for me, that saint.
while he was sanding them, i decided i should use a finer grade sandpaper on the big one just to make it feel smoother because it just felt a little too rough.
after using the fine sand paper the dresser turned gray and i couldn't get it to look good again.
back to staining it...mmeh.
but that monday proved to be exceptionally productive.
i got 2 coats of primer and one of the paint on the drawers and the dresser was stained and clear coated.
plus i got the legs painted this time around.
also, you can see in the before pic that there were 2 knobs per drawer, lamo.
so we patched the old holes with wood glue and drilled a new hole in the middle.
that night we brought the dresser in to be put together.
once putting the drawers in i realized there was a little lip right below the bottom drawer i hadn't stained because i thought it got covered by the drawers.
so frustrating.
so that night, casey hand sanded the little lip while i followed him with the hose of the vacuum so we didn't get sawdust in our whole house.
i did one coat of stain and called it good on that part.
and finally the finished dresser.
we love the way it turned out.
we also don't want to ever have a staining project again in our lives.
we love the way it turned out.
we also don't want to ever have a staining project again in our lives.
(the dresser is actually a dark brown, not black as these pictures show...)
tips we learned along the way.
1. if you're going to stain it, your sanding needs to be PERFECT.
2. if you're staining, sand with the direction of the wood.
3. use tape even when you think it'll be fine if you don't, it'll save you so much time in the end.
4. if you don't want to sand you can actually use a higher class primer, zinsser in the gold can and it works great. it's oil based so you have to throw your brush away but it sticks to ANYTHING. i got a small quart for a little bookshelf i did not want to sand and it stuck to that laminate wood like it was real wood.
5. the flatter the piece, the happier your painting experience will be. i made an effort to get pieces that had were super flat everywhere with this in mind. curves are a beast.
6 invest in pretty knobs, it makes your dresser all the better
although taking on 3 dressers was a beast, we love the way they all turned out.
so glad we can have these pieces for quite a few years and thoroughly enjoy them :)
8 comments:
Awesome! Where did you get the black paisley paper that went into the inside of the drawers?? So cute? I wanted to do that to some of mine.
Wow. You are my idol. Those look great!
Whoa I'm exhausted just reading this! Way to go! That sounds like a lot of work, but the finished products look SOOOOO fantastic! Love the cute knobs and colors!:)
love your transformations! We have done a few ourselves, with similar results...one part joy, 3 parts frustration. By the way, have you ever tried the brand frog tape? Its a lifesaver when it comes to paint not bleeding. I dont use anything else.
hello cuteness!! I am so impressed!! That beautiful blue one looked like a killer!!
the baby dresser is precious! I love the lining.
Don't you just love hobby lobby & their knobs?!! AWESOME job-they all look great(:
Wow, they all look great! I have a dresser in the garage that needs to be painted. Want to do it for me? ;)
phew a LOT of work girl. I'm impressed!
Post a Comment